Description
Specification
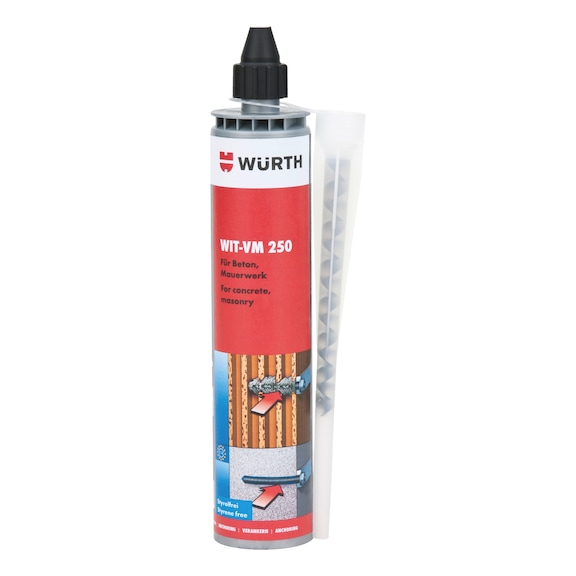
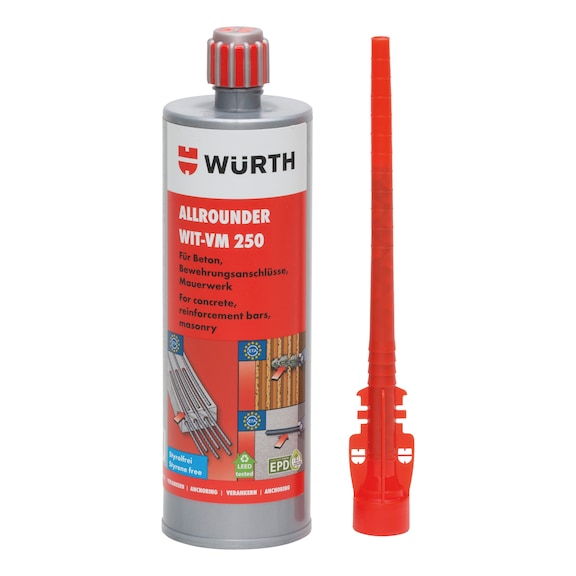
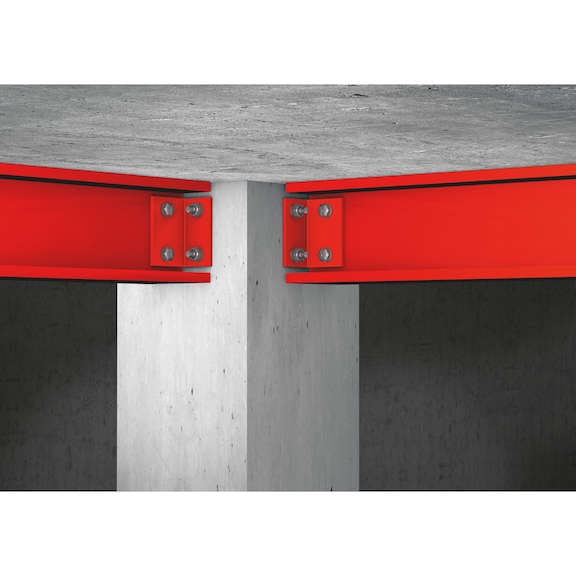
The all-rounder for concrete, masonry and post-installed rebar connections | Two-component resin mortar, styrene-free vinyl ester
Individual fixing point for cracked and uncracked concrete, seismic performance category C1 | Two-component resin mortar, styrene-free vinyl ester | Individual fixing point for cracked and uncracked concrete, seismic performance category C1 | W-VI-A anchor rod, W-VD-A anchor rod, standard threaded rod with acceptance test certificate 3.1 | Individual fixing point for masonry (system with WIT-SH perforated sleeve): | Individual fixing point for masonry (system with WIT-SH perforated sleeve): | WIT-SH perforated sleeve, WIT-AS anchor rod, WIT-IG internally threaded sleeve | Individual fixing point for masonry (system with SH perforated sleeve): | Individual fixing point for masonry (system with SH perforated sleeve): | SH perforated sleeve, W-VI-A anchor rod, W-VI-IG internal thread anchor, standard threaded rod with acceptance test certificate 3.1 | Post-installed rebar connection | Post-installed rebar connection | Proof of Performance | European Technical Assessment ETA-12/0164: Individual fixing point + cracked and uncracked concrete (W-VD-A anchor rod, standard threaded rod with acceptance test certificate 3.1), seismic performance category C1
European Technical Assessment ETA-13/1040: Individual fixing point + masonry consisting of solid and perforated block, autoclaved aerated concrete (WIT-SH perforated sleeve, WIT-AS anchor rod, WIT-IG internally threaded sleeve, autoclaved aerated concrete only with WIT-SH 18×95 perforated sleeve)
European Technical Assessment ETA-16/0757 and ETA-20/0854: Individual fixing point + masonry consisting of solid and perforated block, autoclaved aerated concrete (SH perforated sleeve, W-VI-A anchor rod, W-VI-IG internal thread anchor, threaded rod with acceptance test certificate 3.1, autoclaved aerated concrete only without perforated sleeve)
European Technical Assessment ETA-12/0166: Post-installed rebar connection, 330 ml, 420 ml and 825 ml cartridges only
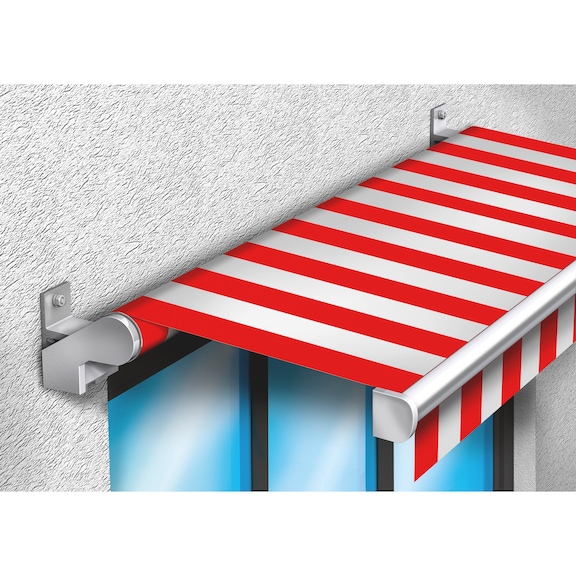
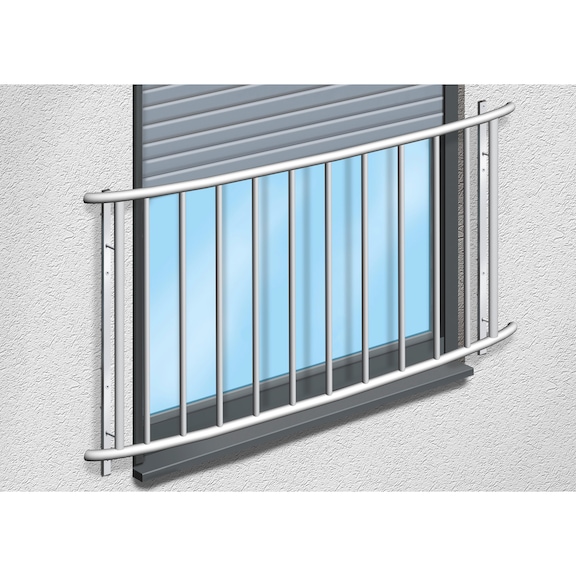
EPD: Environmental product declaration in accordance with ISO 14025 and EN 15804+A2, EPD-AWU-20230406-CBA3 | European Technical Assessment ETA-12/0164: Individual fixing point + cracked and uncracked concrete (W-VD-A anchor rod, standard threaded rod with acceptance test certificate 3.1), seismic performance category C1 | European Technical Assessment ETA-13/1040: Individual fixing point + masonry consisting of solid and perforated block, autoclaved aerated concrete (WIT-SH perforated sleeve, WIT-AS anchor rod, WIT-IG internally threaded sleeve, autoclaved aerated concrete only with WIT-SH 18×95 perforated sleeve) | European Technical Assessment ETA-16/0757 and ETA-20/0854: Individual fixing point + masonry consisting of solid and perforated block, autoclaved aerated concrete (SH perforated sleeve, W-VI-A anchor rod, W-VI-IG internal thread anchor, threaded rod with acceptance test certificate 3.1, autoclaved aerated concrete only without perforated sleeve) | European Technical Assessment ETA-12/0166: Post-installed rebar connection, 330 ml, 420 ml and 825 ml cartridges only | EPD: Environmental product declaration in accordance with ISO 14025 and EN 15804+A2, EPD-AWU-20230406-CBA3 | Application area | Awning
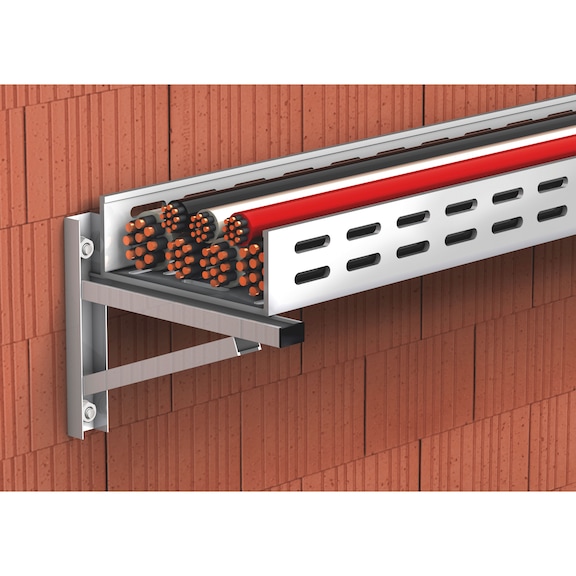
Steel supports
Brackets
French balconies | Awning | Awning | Steel supports | Steel supports | Brackets | Brackets | French balconies | French balconies | Drill holes with a rotary drill (without impact mechanism)
Clean the drill hole:
2x blow out/2x mechanical brush out/2x blow out
Cut anchor rod to length and mark the desired insertion depths
Insert perforated sleeve
Screw mixer onto cartridge
Discard the first section of mortar (until the mortar is uniformly coloured – approx. 10 cm)
Completely fill with composite mortar from end of perforated sleeve
Press in anchor rod up to the bottom of the sleeve while turning slightly
Load can be applied to the reinforcement bar after observing the curing time
Mount component; do not exceed maximum torque
Cut tubular film clip before use!
Screw mixer onto cartridge
Before use, dispense a bead of approx. 20 cm | Drill holes with a rotary drill (without impact mechanism) | Drill holes with a rotary drill (without impact mechanism) | Drill holes with a rotary drill (without impact mechanism) | Clean the drill hole:
2x blow out/2x mechanical brush out/2x blow out | Clean the drill hole:
2x blow out/2x mechanical brush out/2x blow out | Clean the drill hole: | 2x blow out/2x mechanical brush out/2x blow out | Cut anchor rod to length and mark the desired insertion depths | Cut anchor rod to length and mark the desired insertion depths | Cut anchor rod to length and mark the desired insertion depths | Insert perforated sleeve | Insert perforated sleeve | Insert perforated sleeve | Screw mixer onto cartridge | Screw mixer onto cartridge | Screw mixer onto cartridge | Discard the first section of mortar (until the mortar is uniformly coloured – approx. 10 cm) | Discard the first section of mortar (until the mortar is uniformly coloured – approx. 10 cm) | Discard the first section of mortar (until the mortar is uniformly coloured – approx. 10 cm) | Completely fill with composite mortar from end of perforated sleeve | Completely fill with composite mortar from end of perforated sleeve | Completely fill with composite mortar from end of perforated sleeve | Press in anchor rod up to the bottom of the sleeve while turning slightly | Press in anchor rod up to the bottom of the sleeve while turning slightly | Press in anchor rod up to the bottom of the sleeve while turning slightly | Load can be applied to the reinforcement bar after observing the curing time | Load can be applied to the reinforcement bar after observing the curing time | Load can be applied to the reinforcement bar after observing the curing time | Mount component; do not exceed maximum torque | Mount component; do not exceed maximum torque | Mount component; do not exceed maximum torque | Cut tubular film clip before use! | Cut tubular film clip before use! | Cut tubular film clip before use! | Screw mixer onto cartridge | Screw mixer onto cartridge | Screw mixer onto cartridge | Before use, dispense a bead of approx. 20 cm | Before use, dispense a bead of approx. 20 cm | Before use, dispense a bead of approx. 20 cm | Create the drill hole
Clean the drill hole:
Blow out 4x with compressed air/brush out 4x mechanically/blow out 4x with compressed air
Cut anchor rod to length and mark the desired insertion depths
Screw mixer onto cartridge
Discard the first section of mortar (until the mortar is uniformly coloured – approx. 10 cm)
Fill composite mortar from bottom of drill hole
Press in anchoring element up to drill hole base while turning slightly
Visual check of mortar volume, embedment depth mark
Load can be applied to the reinforcement bar after observing the curing time
Mount the component. Do not exceed the maximum torque
Cut tubular film clip before use!
Screw mixer onto cartridge
Before use, dispense a bead of approx. 20 cm | Create the drill hole | Create the drill hole | Create the drill hole | Clean the drill hole:
Blow out 4x with compressed air/brush out 4x mechanically/blow out 4x with compressed air | Clean the drill hole:
Blow out 4x with compressed air/brush out 4x mechanically/blow out 4x with compressed air | Clean the drill hole: | Blow out 4x with compressed air/brush out 4x mechanically/blow out 4x with compressed air | Cut anchor rod to length and mark the desired insertion depths | Cut anchor rod to length and mark the desired insertion depths | Cut anchor rod to length and mark the desired insertion depths | Screw mixer onto cartridge | Screw mixer onto cartridge | Screw mixer onto cartridge | Discard the first section of mortar (until the mortar is uniformly coloured – approx. 10 cm) | Discard the first section of mortar (until the mortar is uniformly coloured – approx. 10 cm) | Discard the first section of mortar (until the mortar is uniformly coloured – approx. 10 cm) | Fill composite mortar from bottom of drill hole | Fill composite mortar from bottom of drill hole | Fill composite mortar from bottom of drill hole | Press in anchoring element up to drill hole base while turning slightly | Press in anchoring element up to drill hole base while turning slightly | Press in anchoring element up to drill hole base while turning slightly | Visual check of mortar volume, embedment depth mark | Visual check of mortar volume, embedment depth mark | Visual check of mortar volume, embedment depth mark | Load can be applied to the reinforcement bar after observing the curing time | Load can be applied to the reinforcement bar after observing the curing time | Load can be applied to the reinforcement bar after observing the curing time | Mount the component. Do not exceed the maximum torque | Mount the component. Do not exceed the maximum torque | Mount the component. Do not exceed the maximum torque | Cut tubular film clip before use! | Cut tubular film clip before use! | Cut tubular film clip before use! | Screw mixer onto cartridge | Screw mixer onto cartridge | Screw mixer onto cartridge | Before use, dispense a bead of approx. 20 cm | Before use, dispense a bead of approx. 20 cm | Before use, dispense a bead of approx. 20 cm | Drill the hole
Clean the drill hole:
Blow out 4x with oil-free compressed air (min. 6 bar)
Brush out 4x mechanically
Blow out 4x with oil-free compressed air (min. 6 bar) (d. <20 mm and d. < 10xds)
Blow out 4x with hand pump, brush out 4x mechanically, blow out 4x with hand pump
Place the embedment depth mark on the rod and check the drilling hole depth
Screw mixer onto cartridge
Discard the first section of mortar (until the mortar is uniformly coloured - approx. 10 cm)
Mount injection equipment, fill composite mortar from bottom of drill hole
Insert the reinforcement bar until it reaches the mark, turning slightly
Visual check of the mortar volume, observe maximum processing time
Load can be applied to the reinforcement bar after observing the curing time | Drill the hole | Drill the hole | Drill the hole | Clean the drill hole:
Blow out 4x with oil-free compressed air (min. 6 bar)
Brush out 4x mechanically
Blow out 4x with oil-free compressed air (min. 6 bar) (d. <20 mm and d. < 10xds)
Blow out 4x with hand pump, brush out 4x mechanically, blow out 4x with hand pump | Clean the drill hole:
Blow out 4x with oil-free compressed air (min. 6 bar)
Brush out 4x mechanically
Blow out 4x with oil-free compressed air (min. 6 bar) (d. <20 mm and d. < 10xds)
Blow out 4x with hand pump, brush out 4x mechanically, blow out 4x with hand pump | Clean the drill hole: | Blow out 4x with oil-free compressed air (min. 6 bar) | Brush out 4x mechanically | Blow out 4x with oil-free compressed air (min. 6 bar) (d. <20 mm and d. < 10xds) | Blow out 4x with hand pump, brush out 4x mechanically, blow out 4x with hand pump | Place the embedment depth mark on the rod and check the drilling hole depth | Place the embedment depth mark on the rod and check the drilling hole depth | Place the embedment depth mark on the rod and check the drilling hole depth | Screw mixer onto cartridge | Screw mixer onto cartridge | Screw mixer onto cartridge | Discard the first section of mortar (until the mortar is uniformly coloured - approx. 10 cm) | Discard the first section of mortar (until the mortar is uniformly coloured - approx. 10 cm) | Discard the first section of mortar (until the mortar is uniformly coloured - approx. 10 cm) | Mount injection equipment, fill composite mortar from bottom of drill hole | Mount injection equipment, fill composite mortar from bottom of drill hole | Mount injection equipment, fill composite mortar from bottom of drill hole | Insert the reinforcement bar until it reaches the mark, turning slightly | Insert the reinforcement bar until it reaches the mark, turning slightly | Insert the reinforcement bar until it reaches the mark, turning slightly | Visual check of the mortar volume, observe maximum processing time | Visual check of the mortar volume, observe maximum processing time | Visual check of the mortar volume, observe maximum processing time | Load can be applied to the reinforcement bar after observing the curing time | Load can be applied to the reinforcement bar after observing the curing time | Load can be applied to the reinforcement bar after observing the curing time | Minimum curing times in concrete
Temperature of base material Processing time Minimum curing time in dry concrete Minimum curing time in wet concrete
≥ -10 °C1) 90 min 24 h 48 h
≥ -5 °C2) 90 min 14 h 28 h
≥ 0 °C2) 45 min 7 h 14 h
≥ +5 °C2) 25 min 2 h 4 h
≥ +10 °C2) 15 min 80 min 160 min
≥ +20 °C2) 6 min 45 min 90 min
≥ +30 °C2) 4 min 25 min 50 min
≥ +35 °C2) 2 min 20 min 40 min
≥ +40 °C3) 1.5 min 15 min 30 min
1) Cartridge temperature: ≥ +15 °C
2) Cartridge temperature: +5 °C to +25 °C
3) Cartridge temperature: < 20 °C | Minimum curing times in concrete
Temperature of base material Processing time Minimum curing time in dry concrete Minimum curing time in wet concrete
≥ -10 °C1) 90 min 24 h 48 h
≥ -5 °C2) 90 min 14 h 28 h
≥ 0 °C2) 45 min 7 h 14 h
≥ +5 °C2) 25 min 2 h 4 h
≥ +10 °C2) 15 min 80 min 160 min
≥ +20 °C2) 6 min 45 min 90 min
≥ +30 °C2) 4 min 25 min 50 min
≥ +35 °C2) 2 min 20 min 40 min
≥ +40 °C3) 1.5 min 15 min 30 min
1) Cartridge temperature: ≥ +15 °C
2) Cartridge temperature: +5 °C to +25 °C
3) Cartridge temperature: < 20 °C | Minimum curing times in concrete | Minimum curing times in concrete | Temperature of base material Processing time Minimum curing time in dry concrete Minimum curing time in wet concrete | Temperature of base material | Processing time | Minimum curing time in dry concrete | Minimum curing time in wet concrete | ≥ -10 °C1) 90 min 24 h 48 h | ≥ -10 °C1) | 1) | 90 min | 24 h | 48 h | ≥ -5 °C2) 90 min 14 h 28 h | ≥ -5 °C2) | 2) | 90 min | 14 h | 28 h | ≥ 0 °C2) 45 min 7 h 14 h | ≥ 0 °C2) | 2) | 45 min | 7 h | 14 h | ≥ +5 °C2) 25 min 2 h 4 h | ≥ +5 °C2) | 2) | 25 min | 2 h | 4 h | ≥ +10 °C2) 15 min 80 min 160 min | ≥ +10 °C2) | 2) | 15 min | 80 min | 160 min | ≥ +20 °C2) 6 min 45 min 90 min | ≥ +20 °C2) | 2) | 6 min | 45 min | 90 min | ≥ +30 °C2) 4 min 25 min 50 min | ≥ +30 °C2) | 2) | 4 min | 25 min | 50 min | ≥ +35 °C2) 2 min 20 min 40 min | ≥ +35 °C2) | 2) | 2 min | 20 min | 40 min | ≥ +40 °C3) 1.5 min 15 min 30 min | ≥ +40 °C3) | 3) | 1.5 min | 15 min | 30 min | 1) Cartridge temperature: ≥ +15 °C
2) Cartridge temperature: +5 °C to +25 °C
3) Cartridge temperature: < 20 °C | 1) Cartridge temperature: ≥ +15 °C
2) Cartridge temperature: +5 °C to +25 °C
3) Cartridge temperature: < 20 °C | 1) | 2) | 3) | Minimum curing times in masonry
Temperature of base material Processing time Minimum curing time in dry masonry Minimum curing time in wet masonry
-10 °C to -6 °C1) 90 min 24 h 48 h
-5 °C to -1 °C2) 90 min 14 h 28 h
0 °C to +4 °C2) 45 min 7 h 14 h
+5 °C to +9 °C2) 25 min 2 h 4 h
+10 °C to +19 °C2) 15 min 80 min 160 min
+20 °C to +24 °C2) 6 min 45 min 90 min
+25 °C to +29 °C2) 4 min 25 min 50 min
+30 °C to +40 °C3) 2.5 min 15 min 30 min
1) Cartridge temperature: ≥ +15 °C
2) Cartridge temperature: +5 °C to +25 °C
3) Cartridge temperature: < +20 °C | Minimum curing times in masonry
Temperature of base material Processing time Minimum curing time in dry masonry Minimum curing time in wet masonry
-10 °C to -6 °C1) 90 min 24 h 48 h
-5 °C to -1 °C2) 90 min 14 h 28 h
0 °C to +4 °C2) 45 min 7 h 14 h
+5 °C to +9 °C2) 25 min 2 h 4 h
+10 °C to +19 °C2) 15 min 80 min 160 min
+20 °C to +24 °C2) 6 min 45 min 90 min
+25 °C to +29 °C2) 4 min 25 min 50 min
+30 °C to +40 °C3) 2.5 min 15 min 30 min
1) Cartridge temperature: ≥ +15 °C
2) Cartridge temperature: +5 °C to +25 °C
3) Cartridge temperature: < +20 °C | Minimum curing times in masonry | Minimum curing times in masonry | Temperature of base material Processing time Minimum curing time in dry masonry Minimum curing time in wet masonry | Temperature of base material | Processing time | Minimum curing time in dry masonry | Minimum curing time in wet masonry | -10 °C to -6 °C1) 90 min 24 h 48 h | -10 °C to -6 °C1) | 1) | 90 min | 24 h | 48 h | -5 °C to -1 °C2) 90 min 14 h 28 h | -5 °C to -1 °C2) | 2) | 90 min | 14 h | 28 h | 0 °C to +4 °C2) 45 min 7 h 14 h | 0 °C to +4 °C2) | 2) | 45 min | 7 h | 14 h | +5 °C to +9 °C2) 25 min 2 h 4 h | +5 °C to +9 °C2) | 2) | 25 min | 2 h | 4 h | +10 °C to +19 °C2) 15 min 80 min 160 min | +10 °C to +19 °C2) | 2) | 15 min | 80 min | 160 min | +20 °C to +24 °C2) 6 min 45 min 90 min | +20 °C to +24 °C2) | 2) | 6 min | 45 min | 90 min | +25 °C to +29 °C2) 4 min 25 min 50 min | +25 °C to +29 °C2) | 2) | 4 min | 25 min | 50 min | +30 °C to +40 °C3) 2.5 min 15 min 30 min | +30 °C to +40 °C3) | 3) | 2.5 min | 15 min | 30 min | 1) Cartridge temperature: ≥ +15 °C
2) Cartridge temperature: +5 °C to +25 °C
3) Cartridge temperature: < +20 °C | 1) Cartridge temperature: ≥ +15 °C
2) Cartridge temperature: +5 °C to +25 °C
3) Cartridge temperature: < +20 °C | 1) | 2) | 3) | European Technical Assessment ETA-12/0164: Individual fixing point + cracked and uncracked concrete (W-VD-A anchor rod, standard threaded rod with acceptance test certificate 3.1), seismic performance category C1
European Technical Assessment ETA-13/1040: Individual fixing point + masonry consisting of solid and perforated block, autoclaved aerated concrete (WIT-SH perforated sleeve, WIT-AS anchor rod, WIT-IG internally threaded sleeve, autoclaved aerated concrete only with WIT-SH 18x95 perforated sleeve)
European Technical Assessment ETA-16/0757 and ETA-20/0854: Individual fixing point + masonry consisting of solid and perforated block, autoclaved aerated concrete (SH perforated sleeve, W-VI-A anchor rod, W-VI-IG internal thread anchor, threaded rod with acceptance test certificate 3.1, autoclaved aerated concrete only without perforated sleeve)
European Technical Assessment ETA-12/0166: Post-installed rebar connection, 330 ml, 420 ml and 825 ml cartridges only
EPD: Environmental product declaration in accordance with ISO 14025 and EN 15804+A2, EPD-AWU-20230406-CBA3 | European Technical Assessment ETA-12/0164: Individual fixing point + cracked and uncracked concrete (W-VD-A anchor rod, standard threaded rod with acceptance test certificate 3.1), seismic performance category C1 | European Technical Assessment ETA-13/1040: Individual fixing point + masonry consisting of solid and perforated block, autoclaved aerated concrete (WIT-SH perforated sleeve, WIT-AS anchor rod, WIT-IG internally threaded sleeve, autoclaved aerated concrete only with WIT-SH 18x95 perforated sleeve) | European Technical Assessment ETA-16/0757 and ETA-20/0854: Individual fixing point + masonry consisting of solid and perforated block, autoclaved aerated concrete (SH perforated sleeve, W-VI-A anchor rod, W-VI-IG internal thread anchor, threaded rod with acceptance test certificate 3.1, autoclaved aerated concrete only without perforated sleeve) | European Technical Assessment ETA-12/0166: Post-installed rebar connection, 330 ml, 420 ml and 825 ml cartridges only | EPD: Environmental product declaration in accordance with ISO 14025 and EN 15804+A2, EPD-AWU-20230406-CBA3
Application
Application area | Anchoring in cracked and uncracked concrete, masonry consisting of solid and perforated brick, aerated concrete and for post-installed reinforcement rods.
Suitable for attaching metal structures, metal profiles, wooden structures, brackets, grids, pipes, cable conduits etc. | Anchoring in cracked and uncracked concrete, masonry consisting of solid and perforated brick, aerated concrete and for post-installed reinforcement rods. | Suitable for attaching metal structures, metal profiles, wooden structures, brackets, grids, pipes, cable conduits etc. | Instructions | A 330 ml and 420 ml cartridge can continue to be used until the best before date, by changing the mixer nozzle or resealing it with the end cap.
Tehnical Information
Type description: WIT-VM 250 | Contents: 420 ml | Included in delivery: Mortar cartridge 420 ml (coaxial) + 1 x mixer nozzle | Suitable application gun: Battery-powered application gun 420ml, Application gun MULTI, Application gun WIT 420ml, Pneumatic application gun 420ml, EasyMax 420 ml, HandyMax 420 ml | Min./max. processing temperature /conditions: -10 to 40 °C / temperature in the anchorage ground during processing and hardening | Min./max. ambient temperature / Conditions: -40 to 120 °C / after completely curing process | Temperature resistance, long-term temperatures max.: 72 °C | Temperature resistance, short-term temperatures max.: 120 °C | Shelf life from production/conditions: 18 Month / cool and dry storage area, 5°C to 25°C | Approval: ETA-12/0164, ETA-13/1040, ETA-12/0166, ETA-16/0757, ETA-20/0854 | Chemical basis: Vinylester, styrene free | Colour: Grey